Setup Tool Length
An-114, Copyright © by Gil Hagiz
Last updated Dec-22-2005
For version 6.01 and higher
Introduction
While many machine shops use tool room to set and measure tool length there are many others that measure the tool on the machine, manually or automatically.
NCPlus has basic built-in procedures to measure and enter tool length into the tool table, but it is recommended to use the more advanced routines that are provided by the machine files.
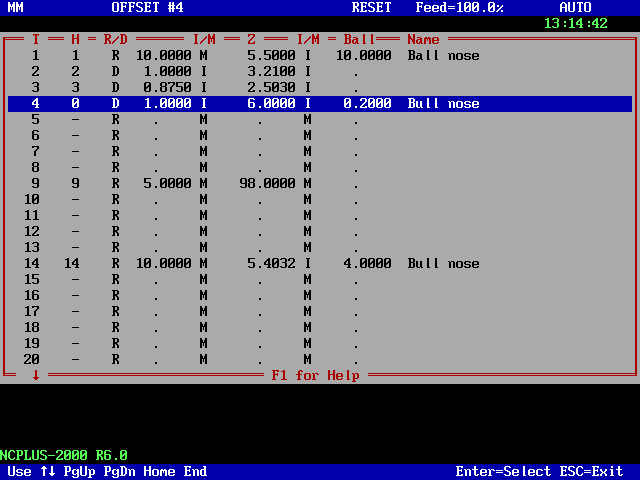
Tool Table
Tool data is given in a tool-table. Each tool is identified by its number, holder (if exists), radius or diameter, length, and ball/bull radius if applicable.
The tool table is opened by F12.
Tool data is given as follows:
T    Tool number.
H    Holder (pot) number. If minus, the tool is deleted. Holder #0 denotes the spindle tool.
R/D  Selects Radius or Diameter. R or D value: +-9999.9999.
I/M  Inch or MM for tool radius or diameter.
Z    Tool length value: +-9999.9999.
I/M  Inch or MM for tool length.
Ball Ball or bull nose radius, same unit as R or D.
Name Description, up to 25 characters. Not used by NCPlus.
Editing Tool Table
- Upon F12 the table opens and the spindle tool is highlighted.
- To select another tool use the Up/Down arrows, Home, End, PgUp, PgDn.
- To go directly to a tool, type its number (press SPACE to clear previous entry).
- To modify, press Enter and overwrite the data.
If an error is detected then the cursor will be located on the error.
Press Enter again to accept the changes or ESC to ignore them.
- For a random ATC enter holder number under H, else enter tool number.
H is updated after every tool change.
- Tool #0 is pre-defined as a tool having zero length and radius.
- To exit press ESC.
Upon ESC the tool table is checked, and if more than one tool is assigned to the same holder an error screen opens and displays the tools vs. the holders.
Notes:
- The tool table has room for 253 tools.
- Tool data can be given in mixed inch/mm, regardless of the program.
- Tools can be either real tools or offsets for tool compensation.
- Real tools are called by M6, either for starting an ATC sequence or for manual change.
After M6 tool length compensation for that tool becomes active.
- Whenever a tool is called from the tool table the variables TL, TR, and TS are set to its length, radius and bull smaller radius, even if radius compensation is not used.
- TL, TR, and TS can be tested or modified from within a program and follow the inch/metric state of the program.
- g40, g41, g42 can call a tool other than the spindle tool to use different length or radius.
- To ignore either tool radius or tool length use / instead of I or M.
What is Tool Length?
Tool length is entered in the tool table so that the program deals with Z relative to the work-piece and the control adds the tool length to the Z-axis position (tool length compensation).
When tool length is set in a tool room the length is measured from the spindle face. These are called Qualified Tools.
If the tool length is measured on the machine the length value of all tools will be relative to the length of the tool with which the measuring device was set.
A and B heads
The absolute length of the tool is essential for 4 and 5-axis machines with rotary axes A or B in the head.
Regular Machine
For a machine where the tool is always in the -Z direction absolute tool length value is less important because the Z-position is the sum of tool length and Z-offset (assuming that tool length compensation is active).
In short: if we enter a longer tool length we can set a lower Z-offset.
For example, a combination of tool length value of 1" and Z-offset of -1" results in same Z as 100" and -100", regardless of the actual tool length
It is important to remember that if we set the Z-offset with a tool having an arbitrary length all other tools will be relative to that tool.
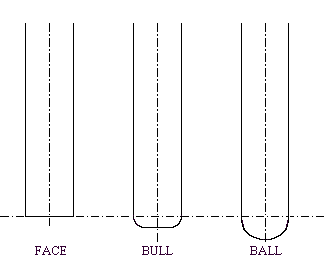
Ball and Bull Nose
Compared to a face mill where tool length is measured to its face, for these tools the length is measured to the center of the ball/bull radius.
However, for 3D contouring, ball and bull nose cutters require 3D radius compensation, either pre-calculated by the post or dynamically calculated by the control.
Basic Tool Length Entry
To measure and enter tool-length proceed as follows:
- Set Z-Home (Z-zero) with a tool that its length is in the table and its tool length compensation is active.
- Use M6 to load another tool in the spindle and touch the Z-Home.
- Press F12 to open the tool table.
- Select the desired tool, if not selected automatically.
- Press Ctrl-Enter (instead of Enter); this will put you in Edit-tool mode while the measured tool length is copied into its place. You can accept the data as is or you can modify it.
- Press Enter to accept, Esc to ignore.
- Press Esc to leave the table.
The new length is immediately effective and Z display should be zero.
- Notes:
- Ball/Bull length should be edited (subtract the radius).
- All tools will be set relative to the first tool.
- If you set another Home with anyone of these tools it will be correct for all tools.
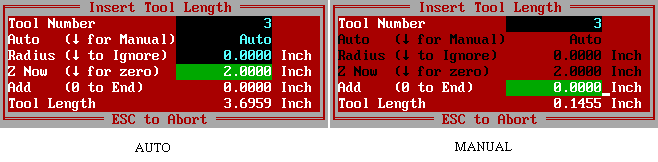
Insert Tool Length
This feature lets you insert tool-length automatically into the tool table in two ways:
- Auto. Tool length is measured on the machine. Ball/Bull radius and H-block can either be used or ignored. The computer will do the math for you.
- Manual. Tool length, or change in length, is known. You can increment-decrement current tool length or just overwrite it with new value.
To insert tool length proceed as follows:
- Set the desired Home with a reference tool having a known length in the tool table.
- Use M6 to load another tool and touch a known point (Z-zero or an H-block).
- Press <Insert> key. A window pops up with current tool number.
Accept the tool or type another tool number.
- Auto is suggested; accept or press down-arrow for Manual.
- If Auto is not selected current tool length is displayed and this section is skipped, otherwise:
Ball/Bull radius and H-block height will be displayed.
- Ball/Bull nose radius is used if defined in the tool table (zero if not).
Enter a different radius if so desired, or press down-arrow to ignore.
This data is not inserted in the tool table.
- Accept or modify 'Z Now' (your current Z if H-block is used), or press down-arrow to ignore.
Any entered value is saved for subsequent tools.
- The calculated tool-length is displayed.
- You can add positive or negative increments to tool-length.
This continues until zero is entered.
- The new tool-length is displayed and can be modified.
- Press Enter to accept or ESC to ignore.
If accepted, the tool table, as well as current tool offset is updated and the new length is immediately effective.
The Z-display is the position of the tool tip relative to Z-zero.
Automatic Tool Length Measurement
Automatic tool length measurement requires a probe (touch or laser), permanently attached to the table, preferably outside the regular working area.
A generic ATLM.CNC utility is available for automatic tool length measurement.
This utility can be modified by the retrofitter according to the type of probe.
It can be used for one tool or for a range of tools if ATC is available.
Like the Z-now in the Insert command the probe's Z-position must be known. Before the probe can be used it must be calibrated with a tool whose length is known.
The ATLM utility can either measure a tool or calibrate the position of the probe.
If the calibration has never been performed it goes directly to calibration.
Otherwise either measurement or calibration is selected from a menu.
For calibration the program uses current tool length, assuming that it is correct, but let you modify it. Whatever you call it, this will be the length of this tool after the calibration is done, and all other tools are later measured from the same zero point as the calibration tool.
In Calibration you jog XYZ so that XY are those of the probe and Z is about 10-40 mm above it.
When ready hit CS to measure the probe and save XYZ for subsequent measurements.
It is recommended that the calibration tool will be the longest tool because if a new tool is entered in the tool table with zero length it will approach the probe from same position as the calibration tool. (Of course an approximate length can be entered).
Once the calibration is done other tools can be measured.
To save time the current length of each tool is used to position the tool above the probe.
The tool is then lowered slowly until it hits the probe, saves the Z-position, and retracts.
The Z-position and the probe calibrated position are used to calculate the new length, which is saved into the tool table.